
Image from eventmodeling.org
Qlerify is the dedicated Event Modeling tool designed to provide structure and clarity to your software design.
Event Modeling has emerged as a powerful method for designing Business Information Systems, ensuring alignment between business teams and development teams. It also enables a modular design approach, where independent teams can develop functional "slices" in parallel, shortening time-to-market at a fixed cost.
Although the strength of Event Modeling lies in its simplicity, mastering it can require significant effort and time. However, Qlerify is now transforming this process by generating a fully detailed event model from any workflow description in minutes. This accelerates system design while maintaining structure, clarity, and close collaboration with domain experts.
Qlerify is also revolutionizing the implementation phase, letting your AI coding agent generate code directly from an event or domain model over MCP.
This guide offers a step-by-step approach to Event Modeling in Qlerify, drawing on the core concepts from Adam Dymitruk’s original Event Modeling post—including the automation and translation patterns. We won’t detail all Qlerify features here, as you can find more information in our article on Event Storming and DDD (links provided at the bottom of the page) as well as in the in-app help texts.
We'll cover the seven steps of Event Modeling and recreate the example presented in the blog post "What is Event Modeling?".
While some visual elements, such as the "waterline," are presented differently in Qlerify, we've successfully applied Event Modeling in many cases using the approach presented here.
Now, let’s dive in. Ensure you're logged into Qlerify with a blank Workflow open and review the following Card Type Settings:
You can also navigate to the AI tab and pick your LLM model of choice. For this walkthrough, we used Claude Sonnet 5.
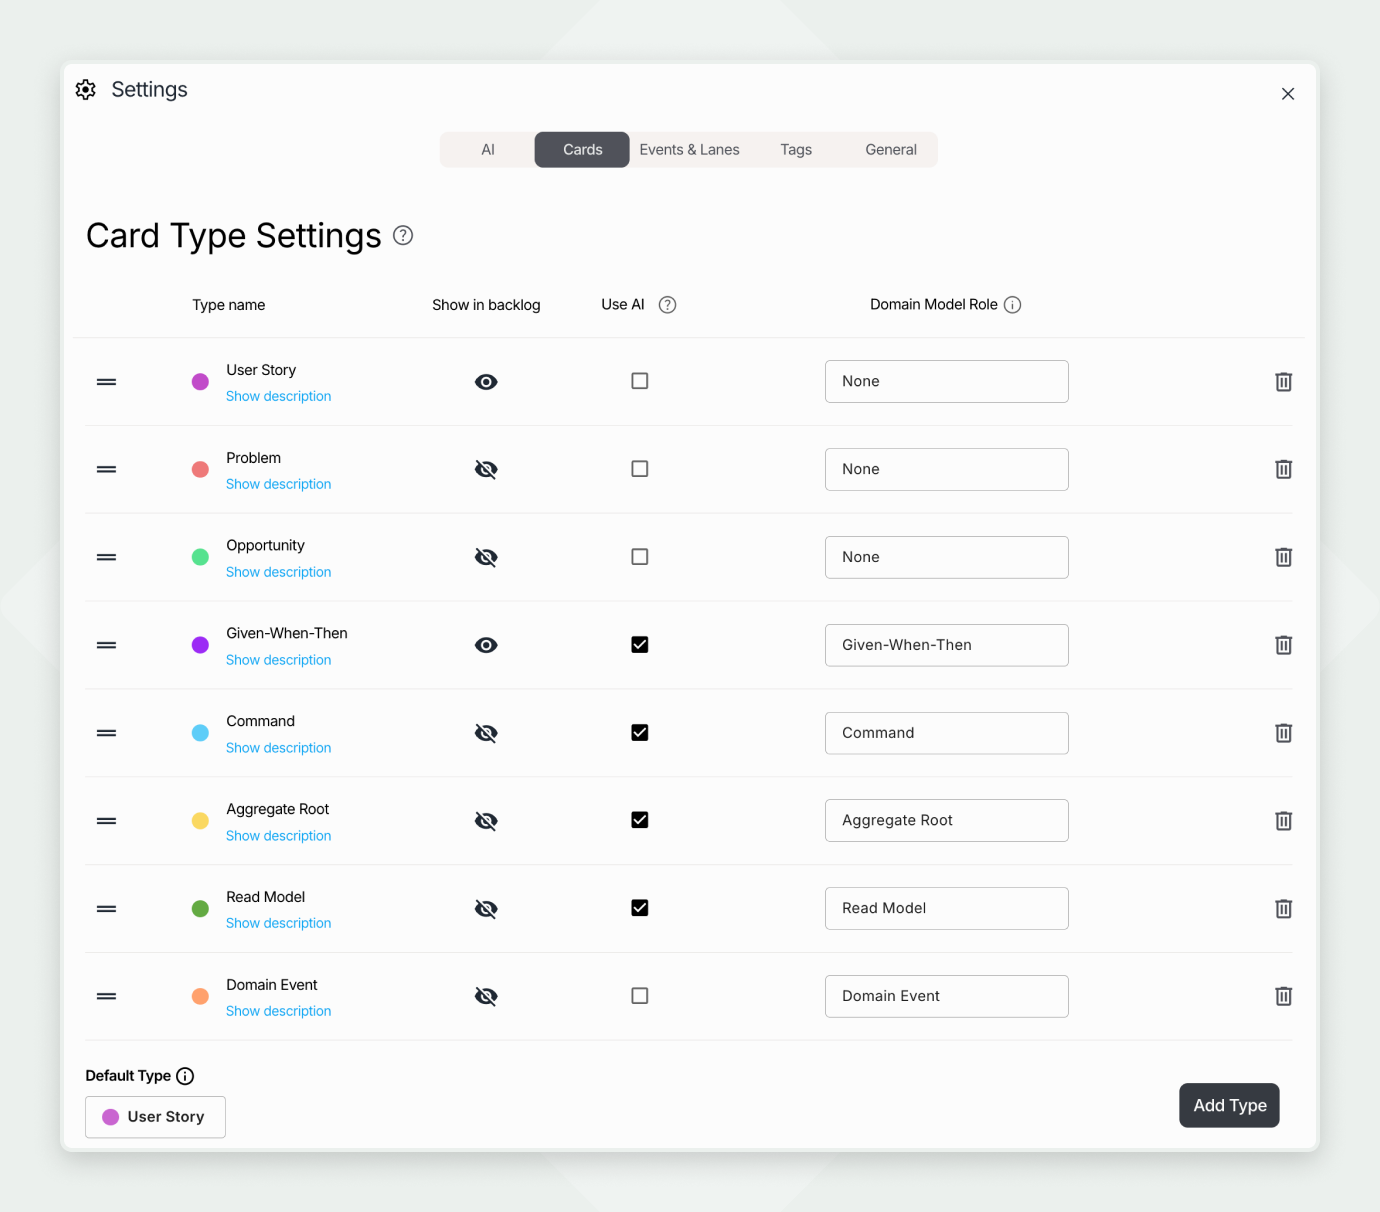
Close Settings to return to the blank Workflow diagram.
Brainstorm state-changing events together with your human colleagues and AI. Use the prompt below or describe your own scenario to let AI assist in brainstorming.
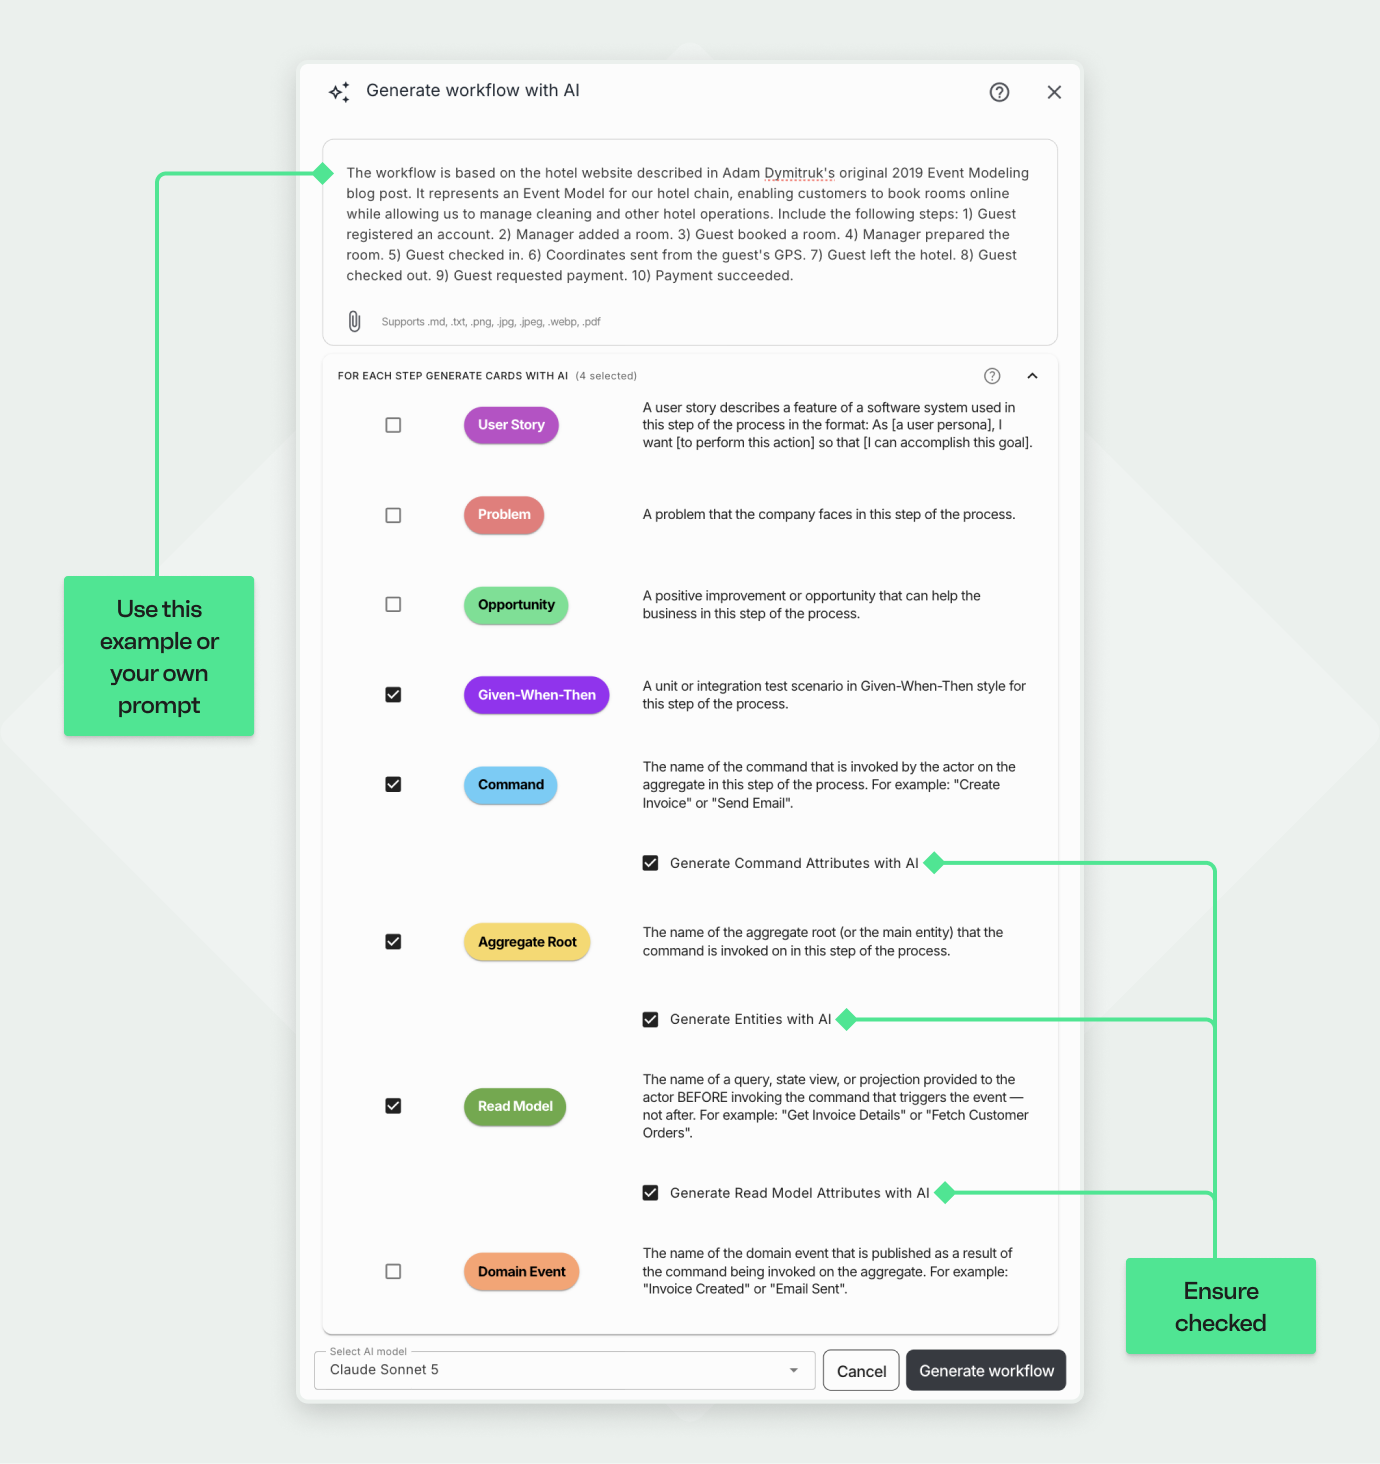
The workflow is based on the hotel website described in Adam Dymitruk’s original 2019 Event Modeling blog post. It represents an Event Model for our hotel chain, enabling customers to book rooms online while allowing us to manage cleaning and other hotel operations. Include the following steps: 1) Guest registered an account. 2) Manager added a room. 3) Guest booked a room. 4) Manager prepared the room. 5) Guest checked in. 6) Coordinates sent from the guest's GPS. 7) Guest left the hotel. 8) Guest checked out. 9) Guest requested payment. 10) Payment succeeded.
In the empty workflow, click on "Generate workflow with AI," paste the prompt, and then click "Generate workflow" using the default options.
Wait for the process to complete. You should now see something like this (although differences are expected when using generative AI):
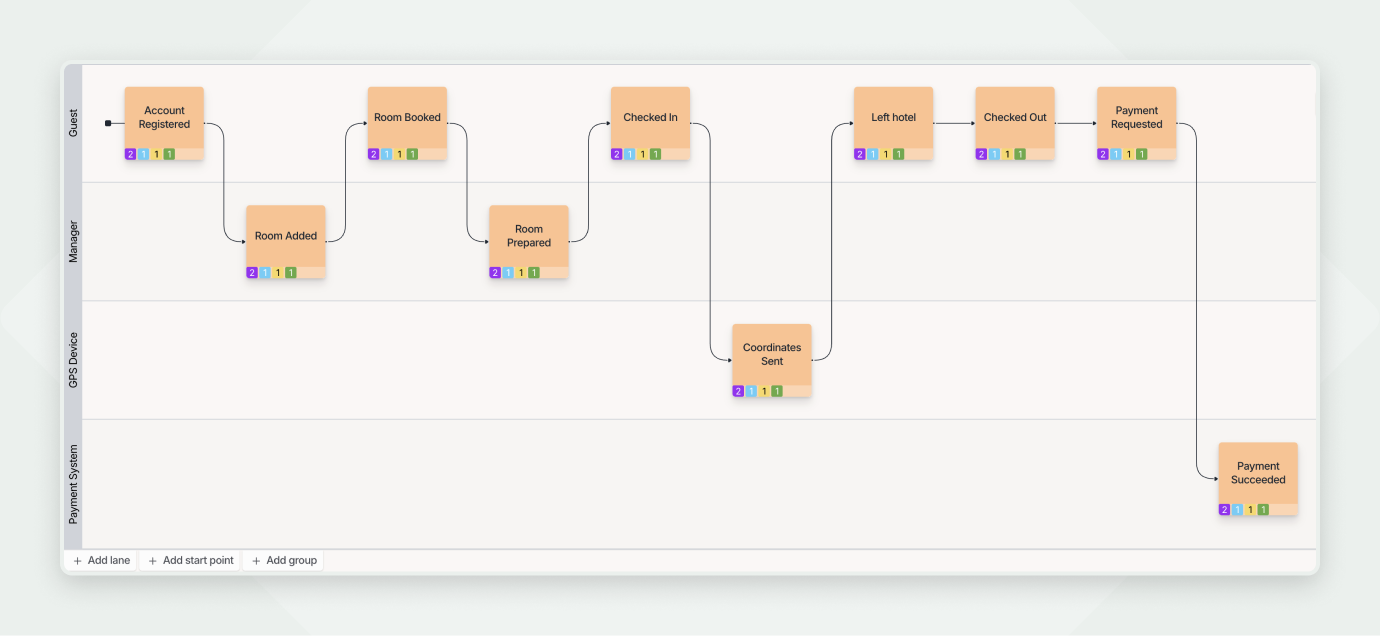
In this step, we'll review the timeline and ensure it creates a coherent story composed of events. This time, AI generated two swimlanes—GPS Device and Payment System—which seem to represent systems or bounded contexts rather than actors. In Qlerify, we typically use swimlanes for roles such as Guest or Manager, not for systems or bounded contexts. Since these steps are automated (as we know from the blog post), we can consider Automation an actor.
Note: Delete lane stays greyed out until the lane is empty, so move the events out first.
From the blog post, we know that there are two more automated events: Left hotel and Checked out. Move these events as well to the new Automation swimlane. Now, our workflow looks like this:
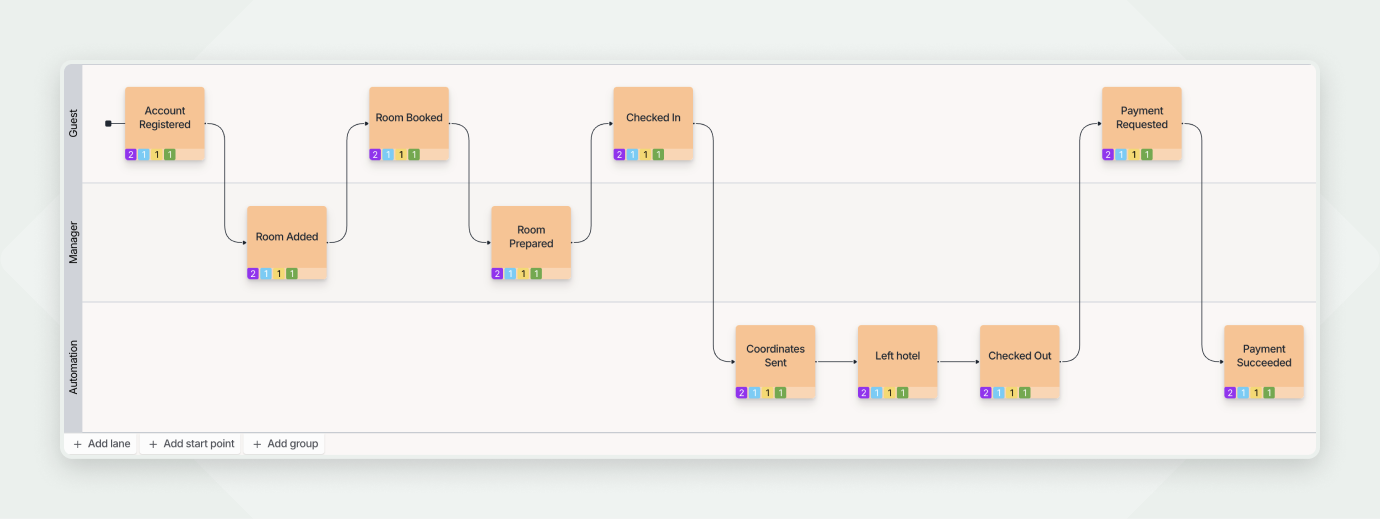
Note: The arrows between events represent a plausible timeline but do not indicate that each event automatically triggers the next. They also do not enforce a strict sequence in which the events must occur. Instead, they provide an example of how events typically unfold within the organization.
For each event we'll create a UI mockup of an input form that the actor fills out and submits. If an event is an automated step, imagine it as a robot filling out the form and pressing a submit button.
The Domain Model tab shows the selected event as a row inside the Guest Account Management bounded context assigned by AI. Read the row from left to right:
The sidebar shows the Command fields as a form filled with example data. Use the arrows beside Example 1 of 3 to view the other examples. Add, edit, reorder, or remove fields on the Command to update the form mockup.
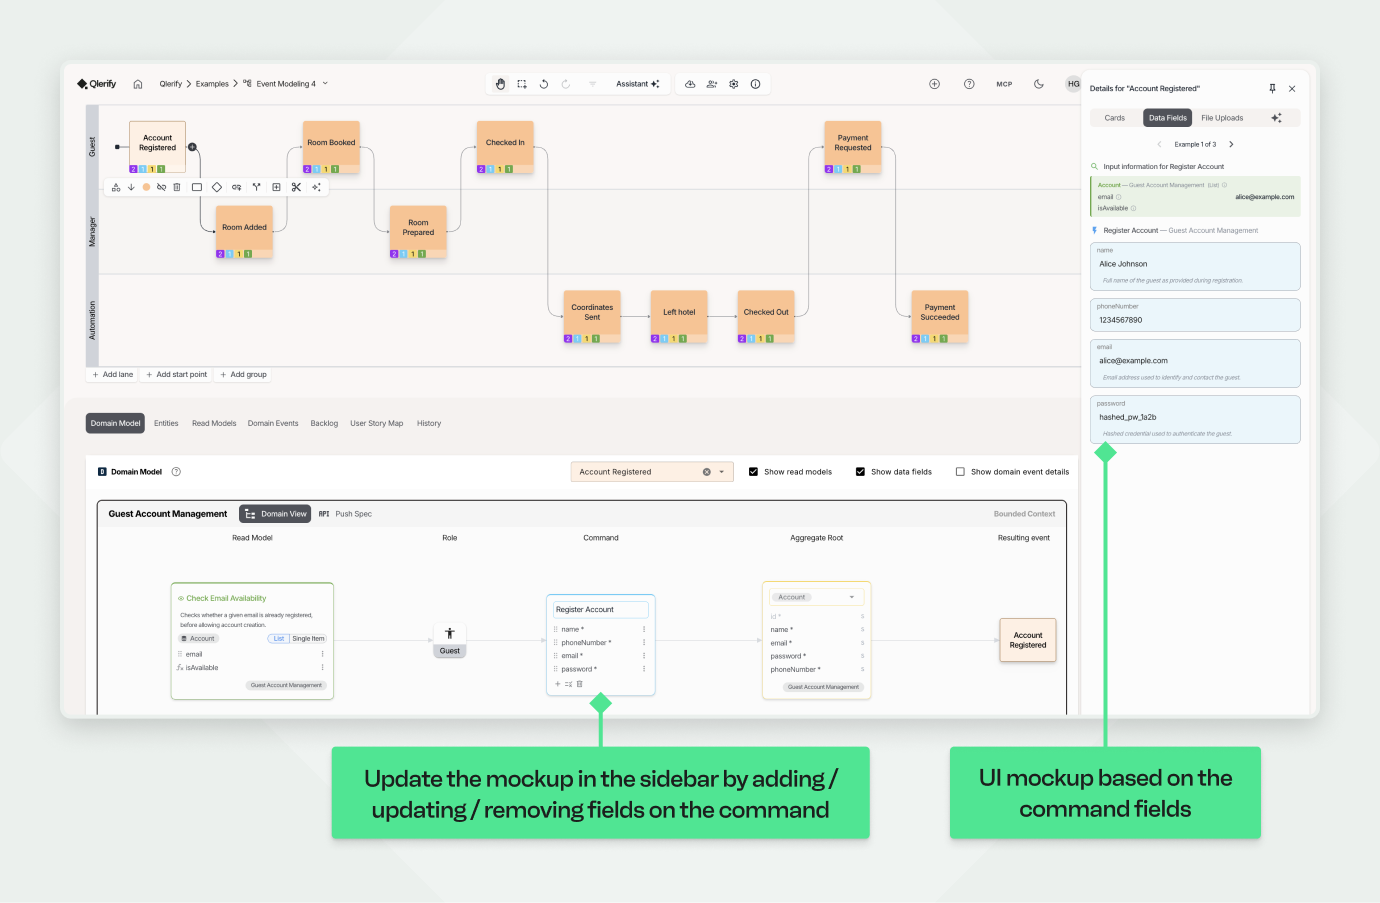
Ask the question: "What does the input form look like when a guest registers for an account?" A registration form normally captures a phone number as well, and the generated command has none - so let's add one.
A Command's parameters should map to attributes on its Aggregate Root, so add the field to the entity first:
The mockup in the sidebar updates as you go.
In this step we simply give a name to the command that will be invoked when the form is submitted. The command name is already suggested by AI as Register Account, so if this looks fine we can move on.
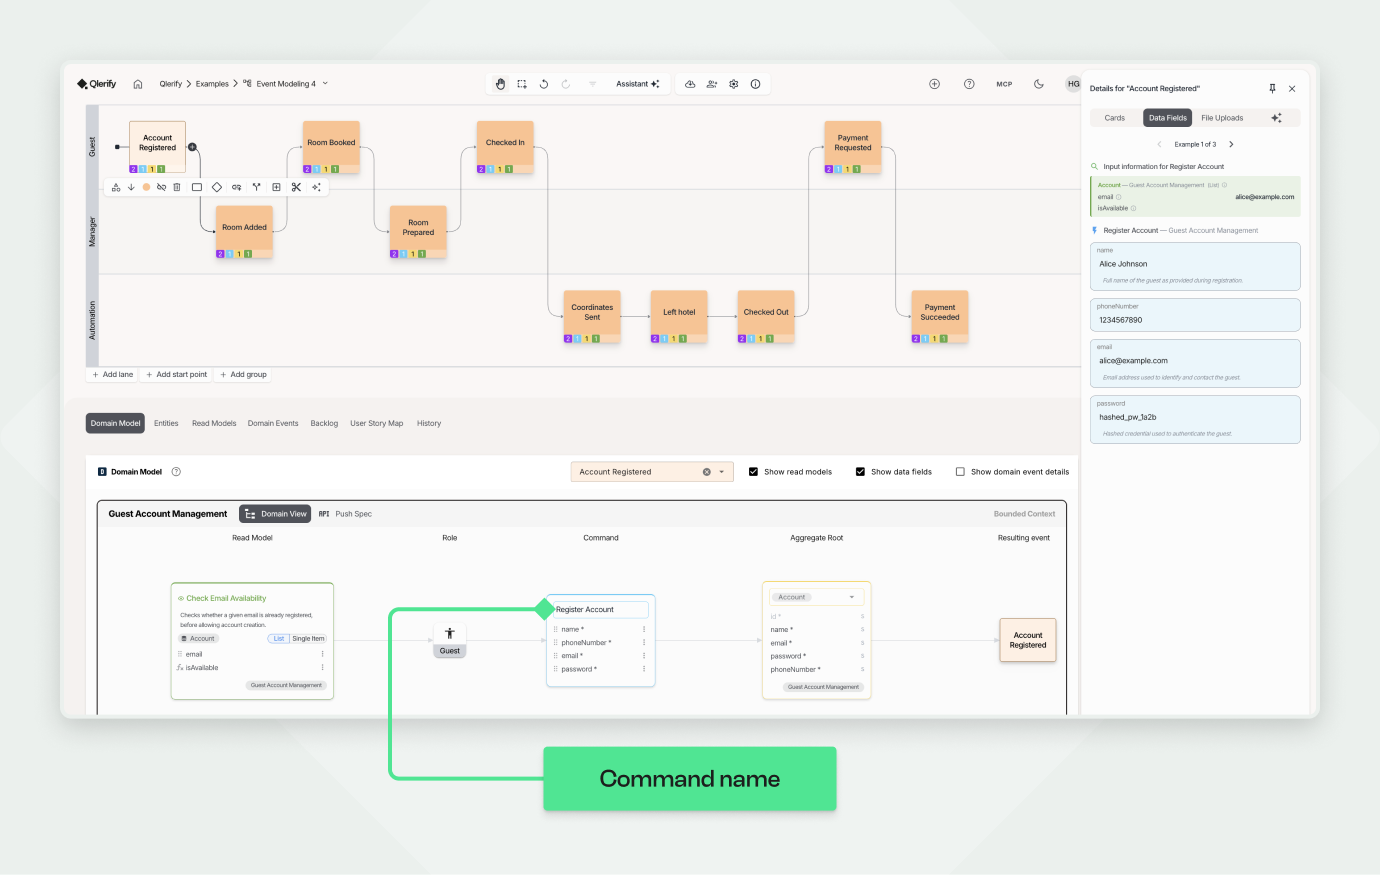
Although this step is called "Identify Outputs", we will think of it as data provided before invoking the Command, basically output from another earlier event. We refer to it as the Read Model and consider the Read Model as being consumed before the Command is triggered. This approach centers the discussion around a single actor.
Ask the question: "What information does the guest need in order to register an account?"
Here AI proposed Check Email Availability, which tells the guest whether the email they entered is already registered. Depending on your product you might also want Terms & Conditions, Privacy Policy or Benefits here. Just like with a Command, you can add, update, and remove data fields from the Read Model.
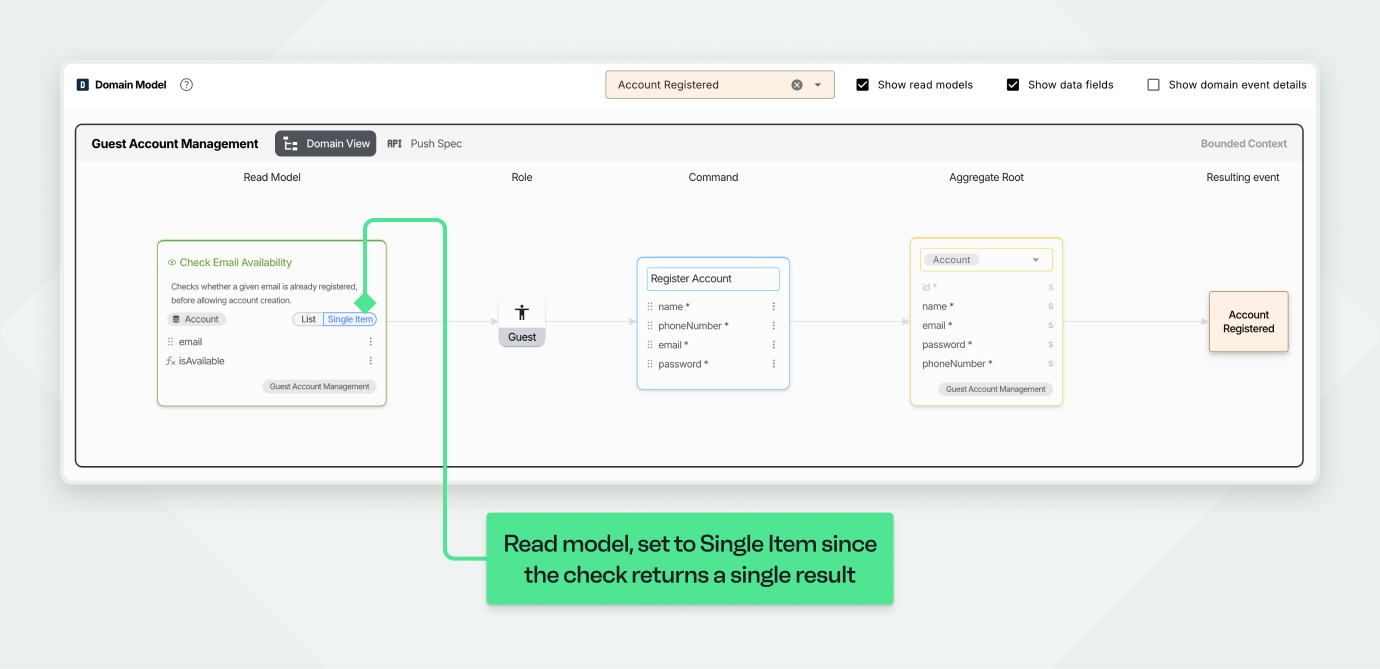
Note: Whether you see the Read Model (or state view) as the output of a Domain Event or as the input for another is simply a matter of perspective.
Note: An Event should have exactly one command associated with it, but it can have multiple associated Read Models.
Now, iterate the steps 3, 4 and 5 for all events. Here we provide a few key examples that cover all the most common patterns.
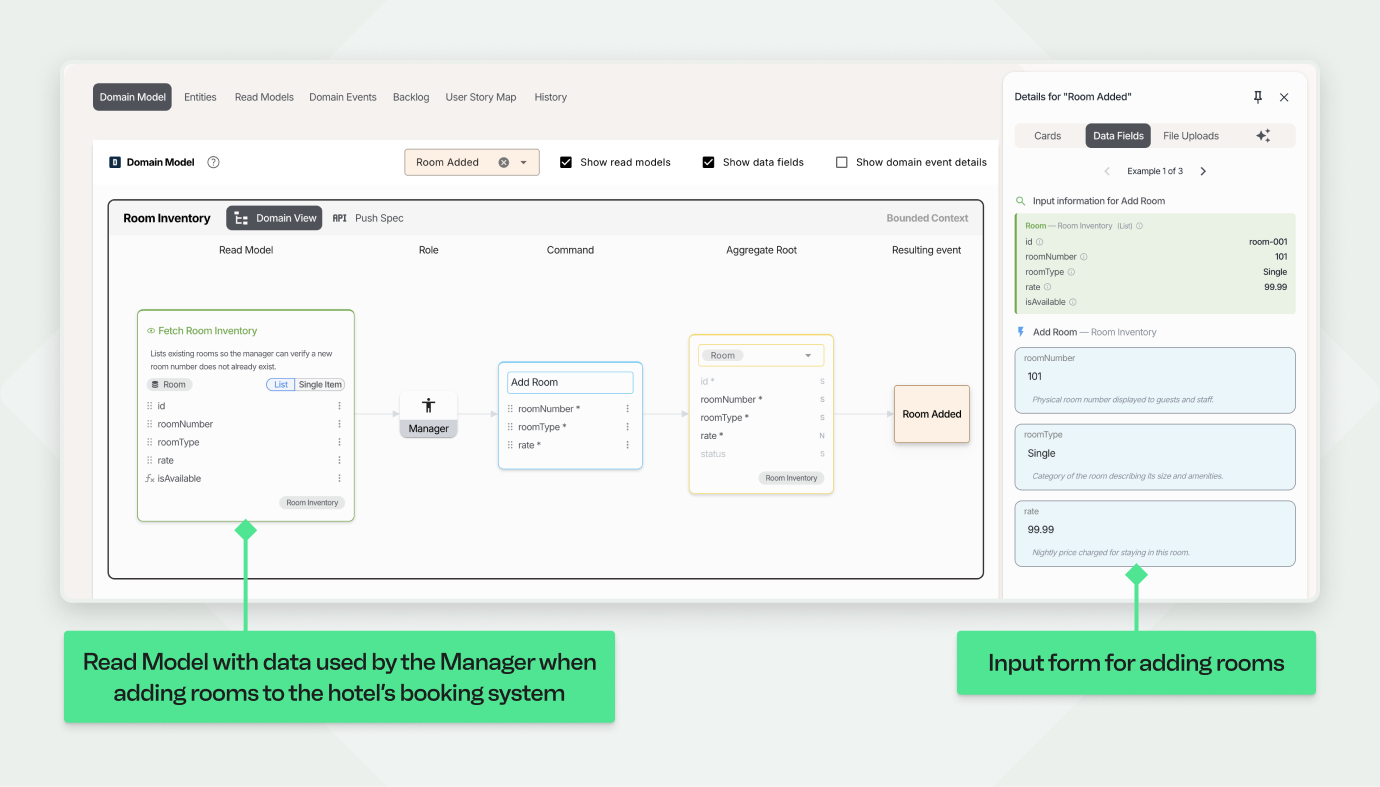
Click on the event Room Added. This step, like the previous one, uses a regular input form. However, it's tailored for the manager to add rooms to the booking system.
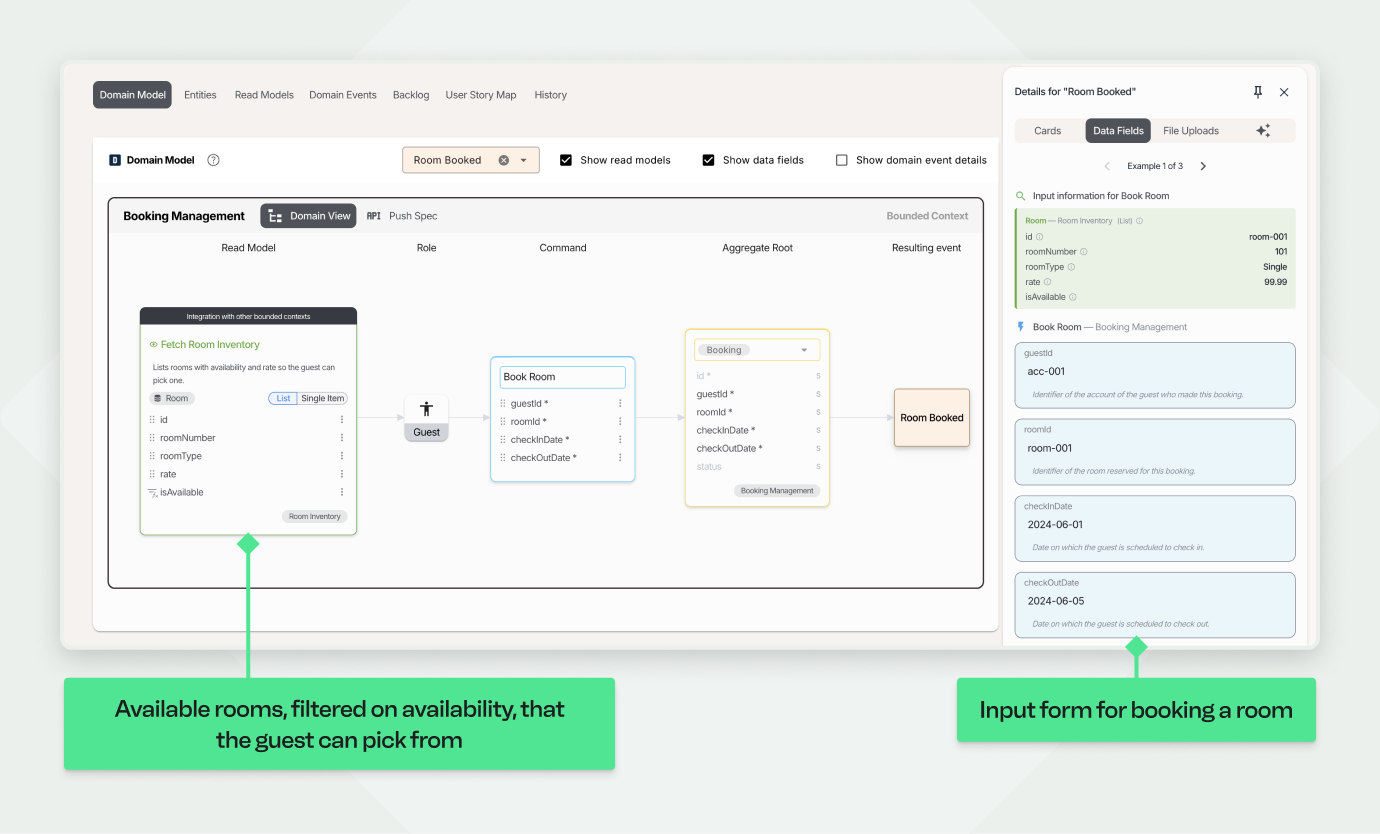
This step features another regular input form, designed for the room booking process.
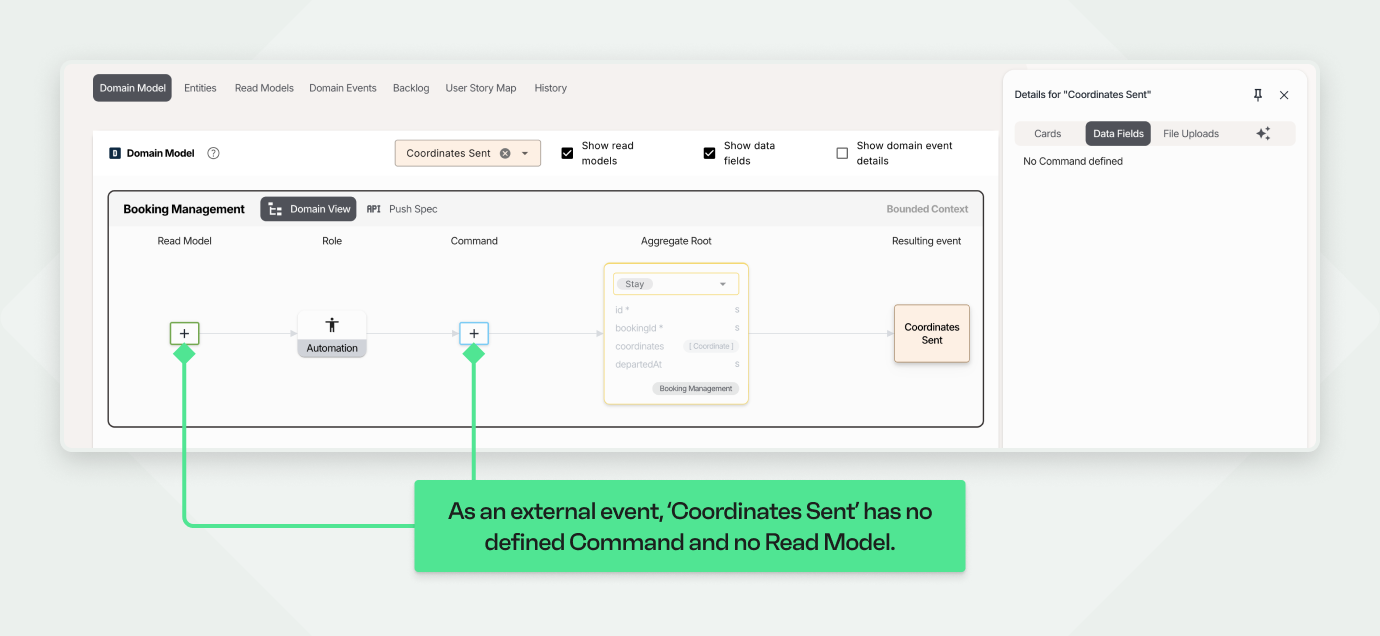
Let's jump ahead to the Coordinates Sent event. This Event is the first of two steps in integrating with an external system (the second step is Left hotel). Unlike previous events, it is not triggered by a human but is automatically initiated by the guest’s mobile device. Because this interaction occurs outside our system (unless we are also building the GPS Tracker), it functions as a black box.
For external events, delete the Command and the Read Model (using the bin icon that is displayed when hovering on the Command and the Read Model). We keep the Event for reference, and we keep the Entity, but do not model the inner details of either the Command or the Read Model. Detailed modeling will happen in the following Event, where we receive this Domain Event, and where the Read Model will contain the incoming data.
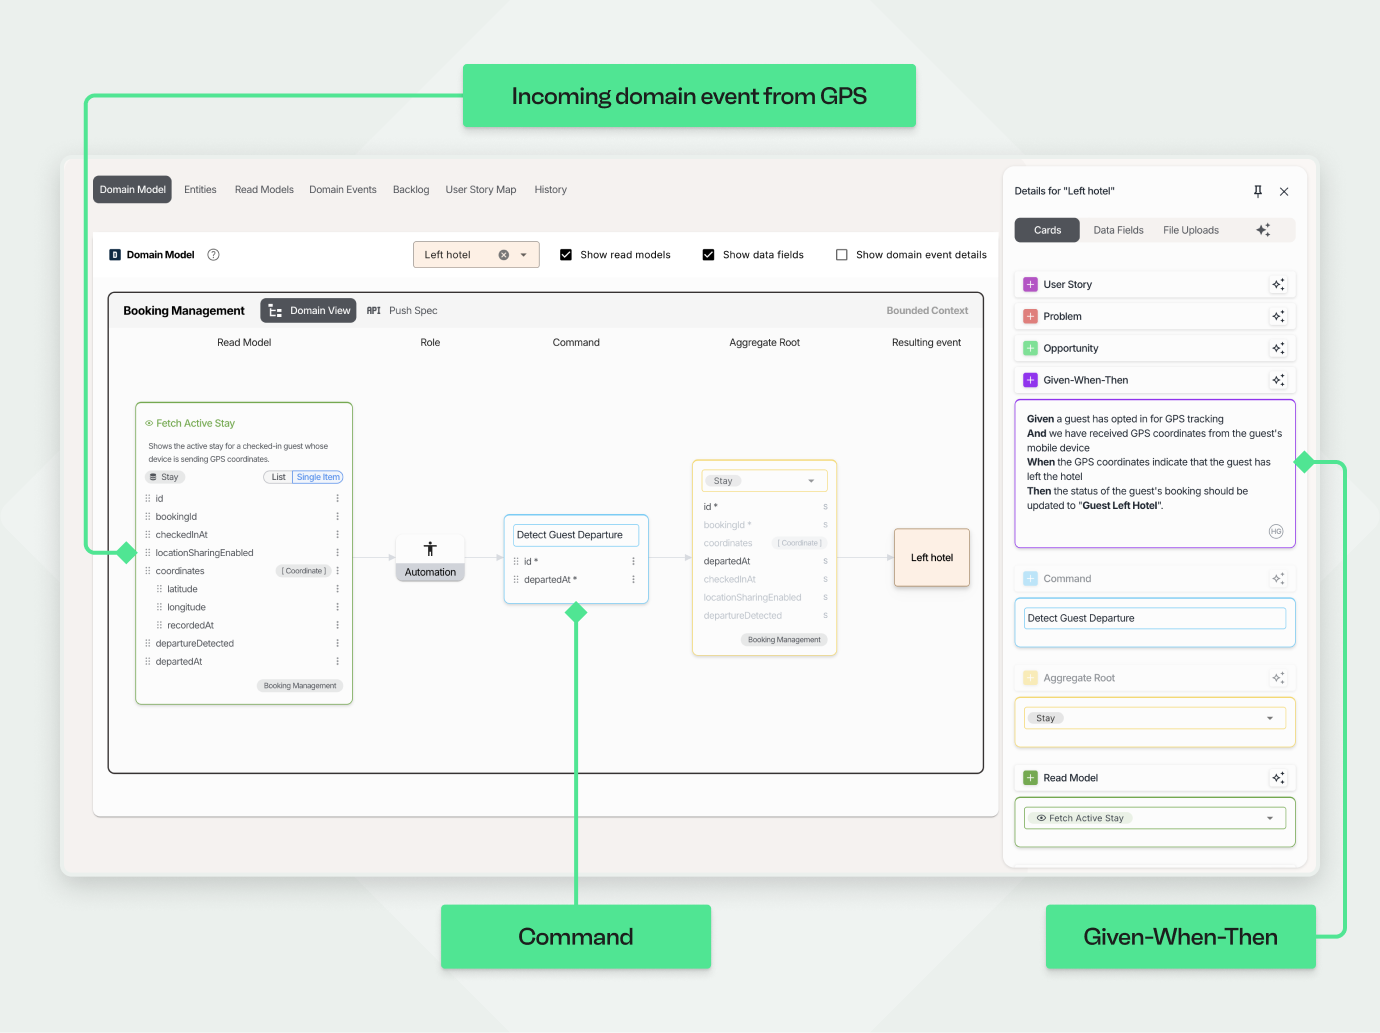
This Event is automatically triggered by the preceding external eventS Coordinates Sent, and does not have a visual input form. In Event Modeling, this step is referred to as a Translation. It receives coordinates and interprets them to determine whether the guest has left the hotel or not. If the coordinates indicate that the guest has left, the Left hotel event is triggered; if not, the Event is not triggered.
If you ever need to change which entity a Read Model reads from, use the entity dropdown at the top of the green box, then press the AI button ("Generate fields with AI") or the field selector to pull in its fields.
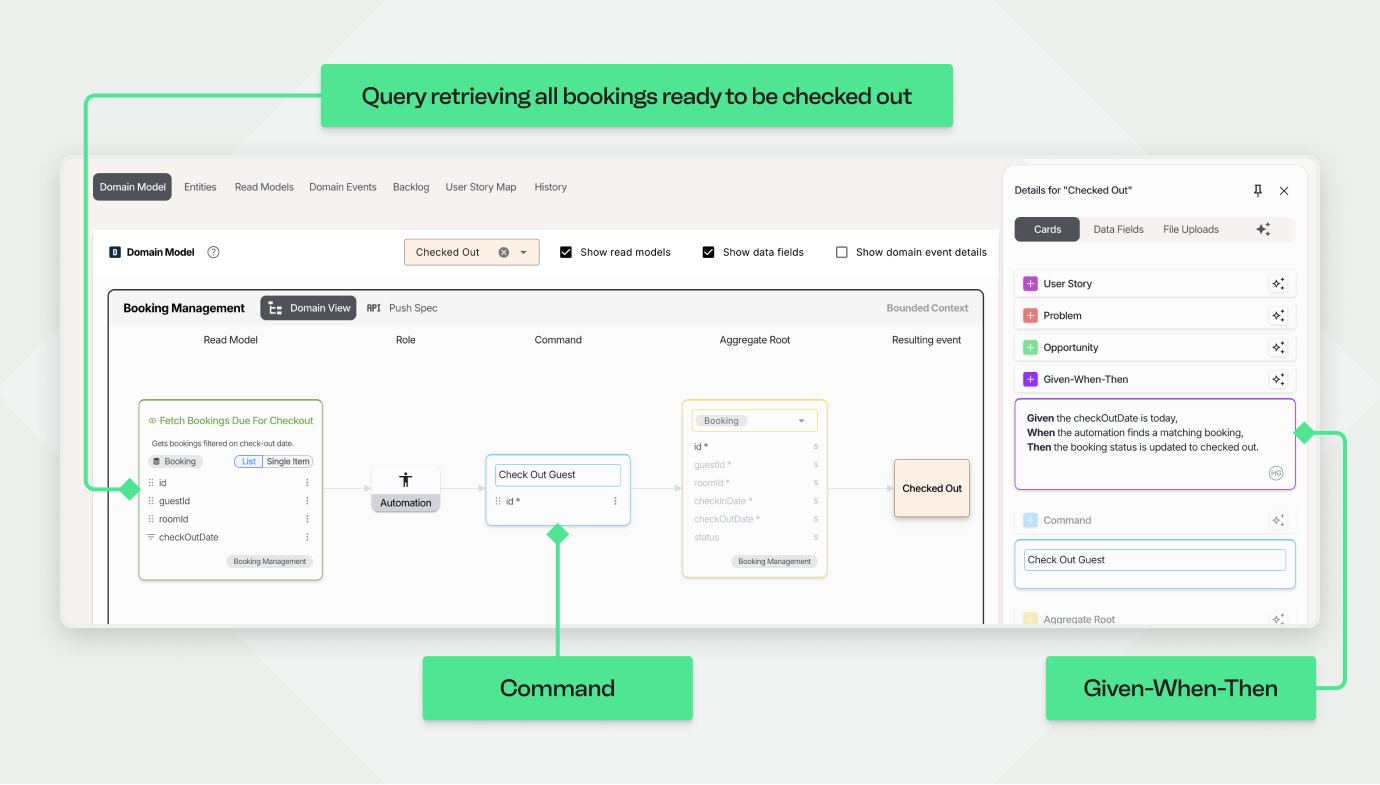
Now, we arrive at the Domain Event Checked Out Guest, another automated step that requires no manual input.
At this stage, the payment can be processed, and when the guest opens the booking next time, a form to complete the transaction will be available.
The input form should capture approval for processing the payment.
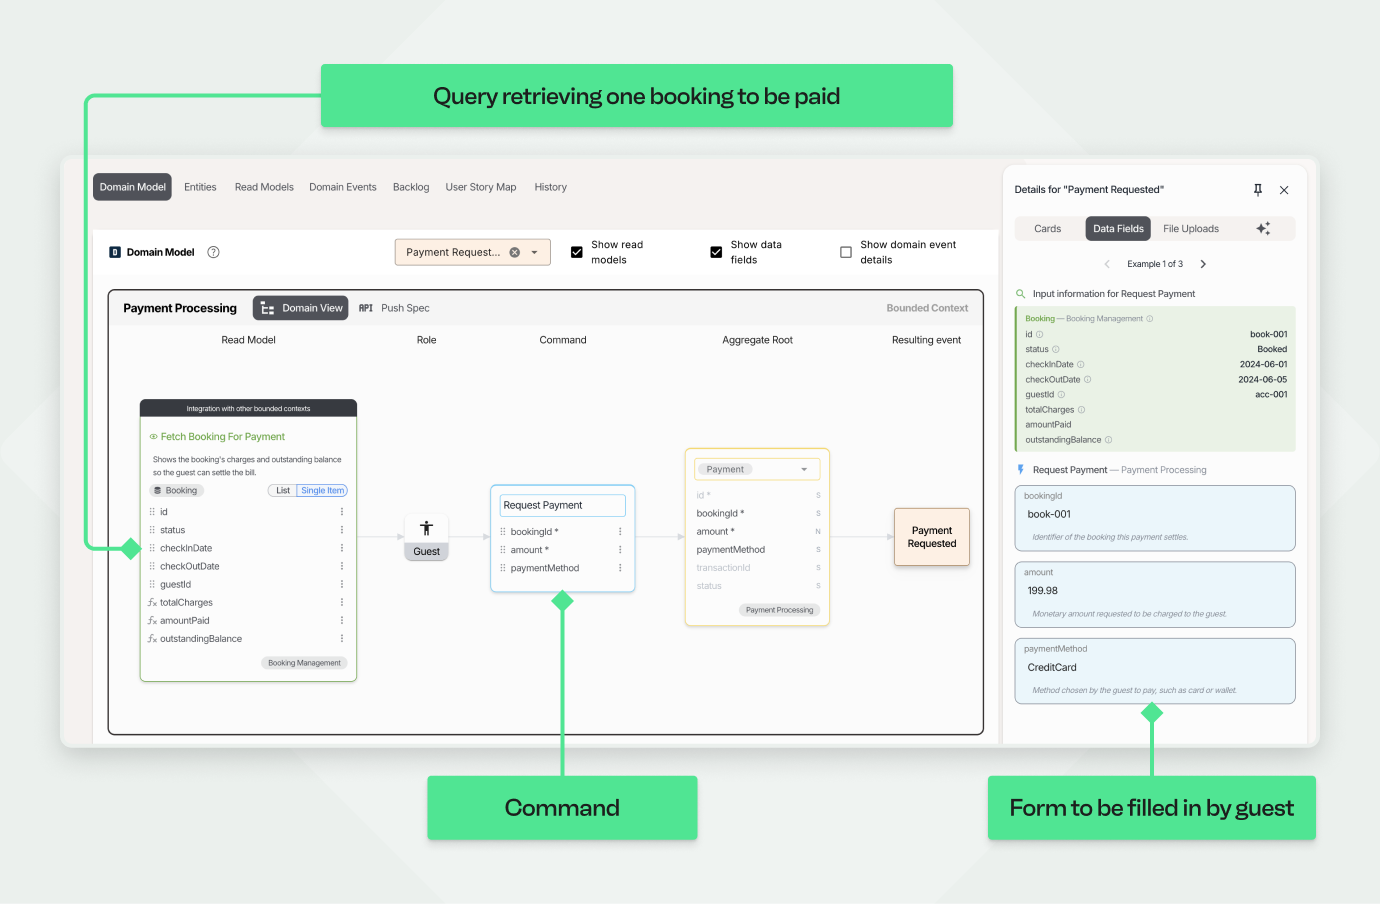
The Payment succeeded step is automated similarly to the Checked Out Event, but with one key difference: in addition to reading a query and invoking a Command, it involves an outgoing call to an external payment service provider. This call must succeed for the Payment succeeded Domain Event to be triggered. Although this outgoing call isn't explicitly modeled here, we'll describe the success criteria using a GWT (Given-When-Then) scenario.
Note: This step can also be modeled explicitly in two steps, one step for the Command invoked on the external service and one step for the Command storing the result in our system.
Now it's time to organize the system's parts into autonomous components. This step is visualized slightly differently than in standard Event Modeling, although the underlying concept remains the same. When AI generated the workflow it already proposed a set of Bounded Contexts and assigned every Aggregate Root to one. So this step is not about creating boundaries from scratch — it is about reviewing the ones AI chose and deciding whether they match how your teams are actually organized.
In the Domain Model tab, clear the event selector to show all events, and untick Show read models and Show data fields for a compact view of the boundaries.
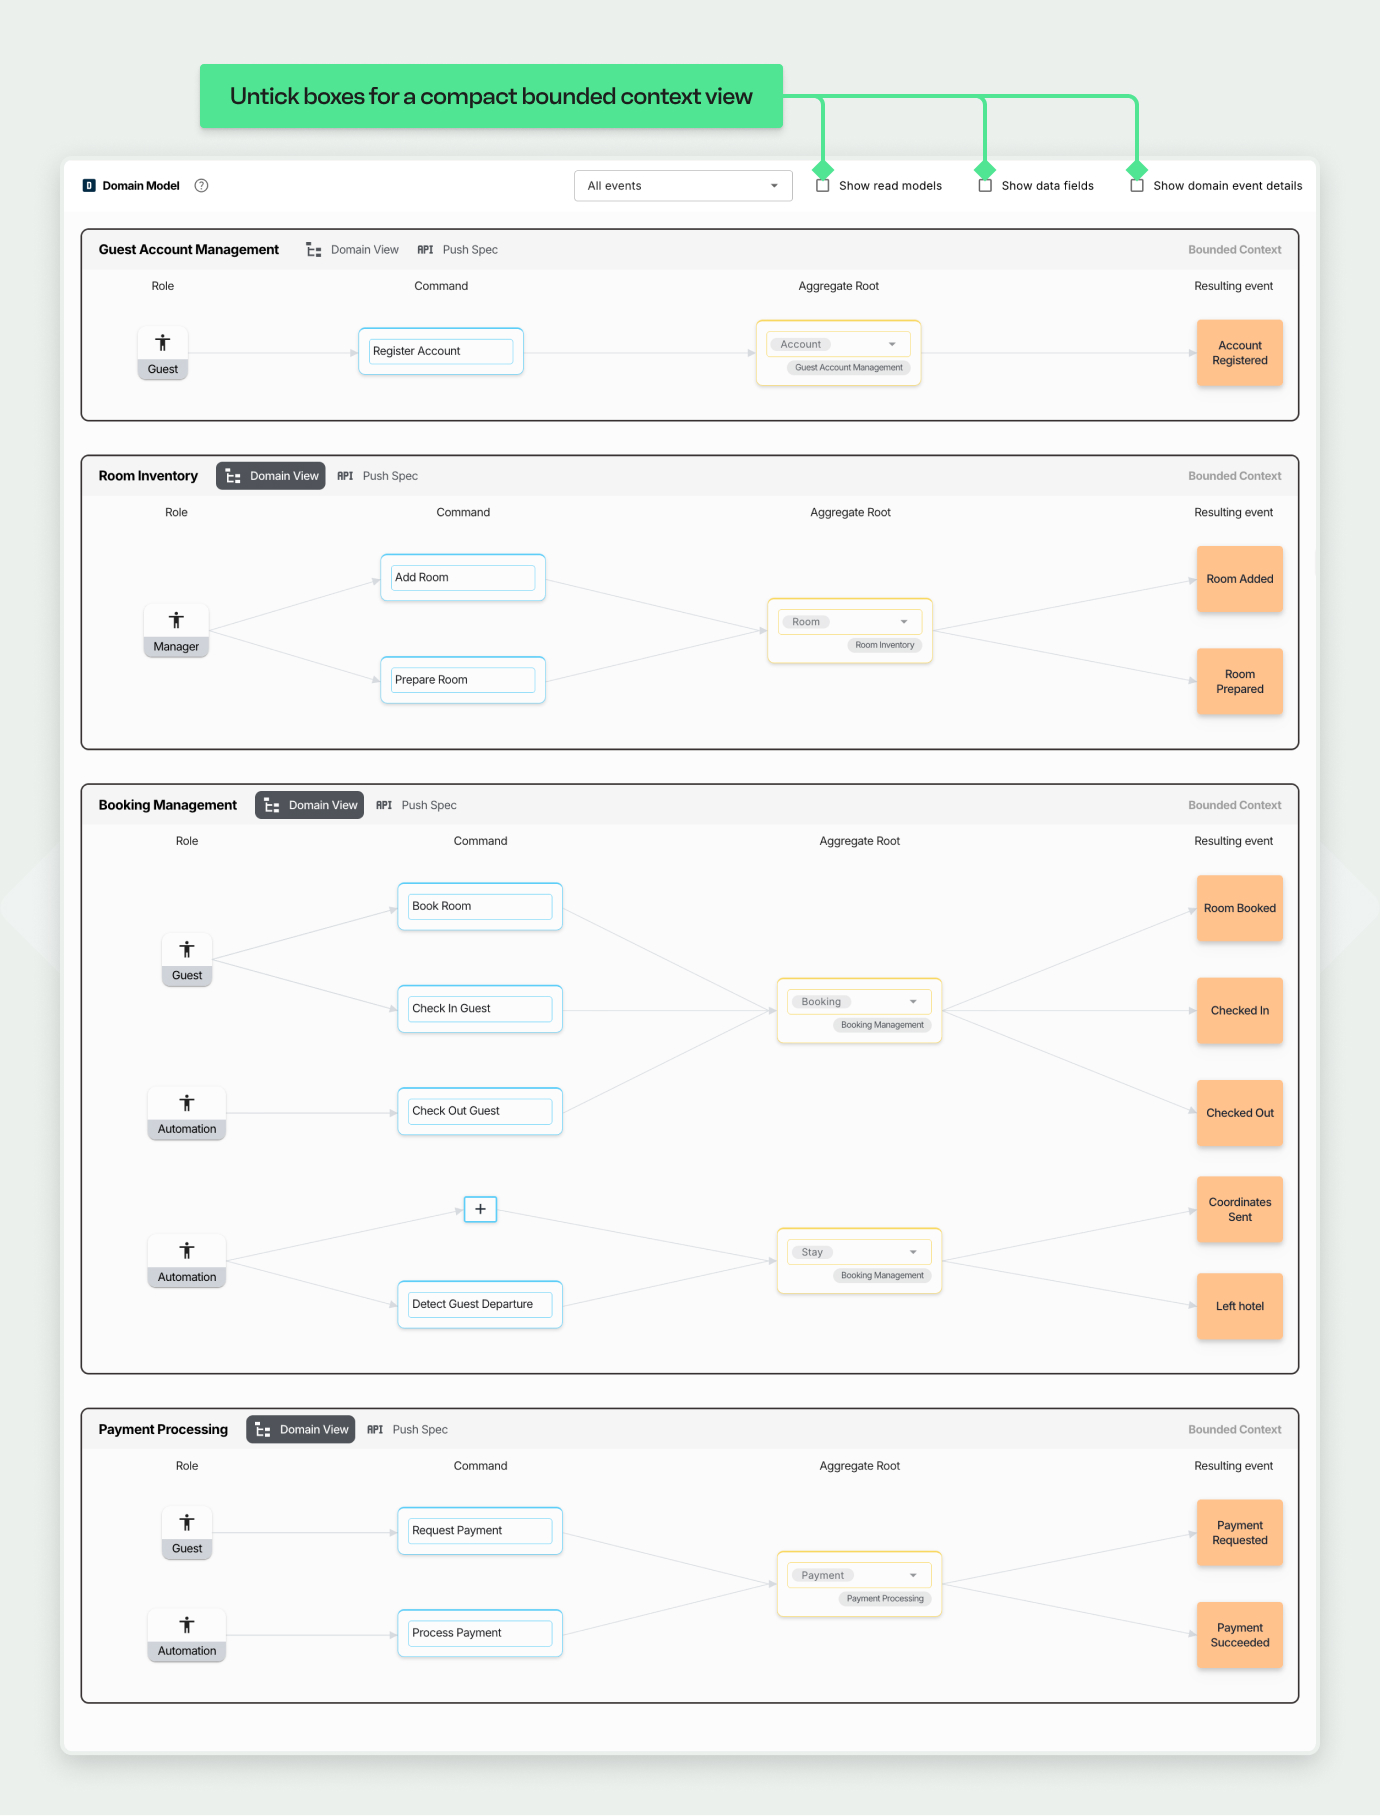
Here AI produced four contexts: Guest Account Management, Room Inventory, Booking Management and Payment Processing.
Compare that with Adam Dymitruk's original post, which used Auth, Inventory, Payment and GPS. The interesting difference is the last one: AI folded the guest's location tracking into Booking Management rather than giving it a context of its own. Neither choice is automatically right — it depends on whether a separate team would own the tracking integration. That is exactly the Conway's Law question this step exists to ask.
For each context, ask:
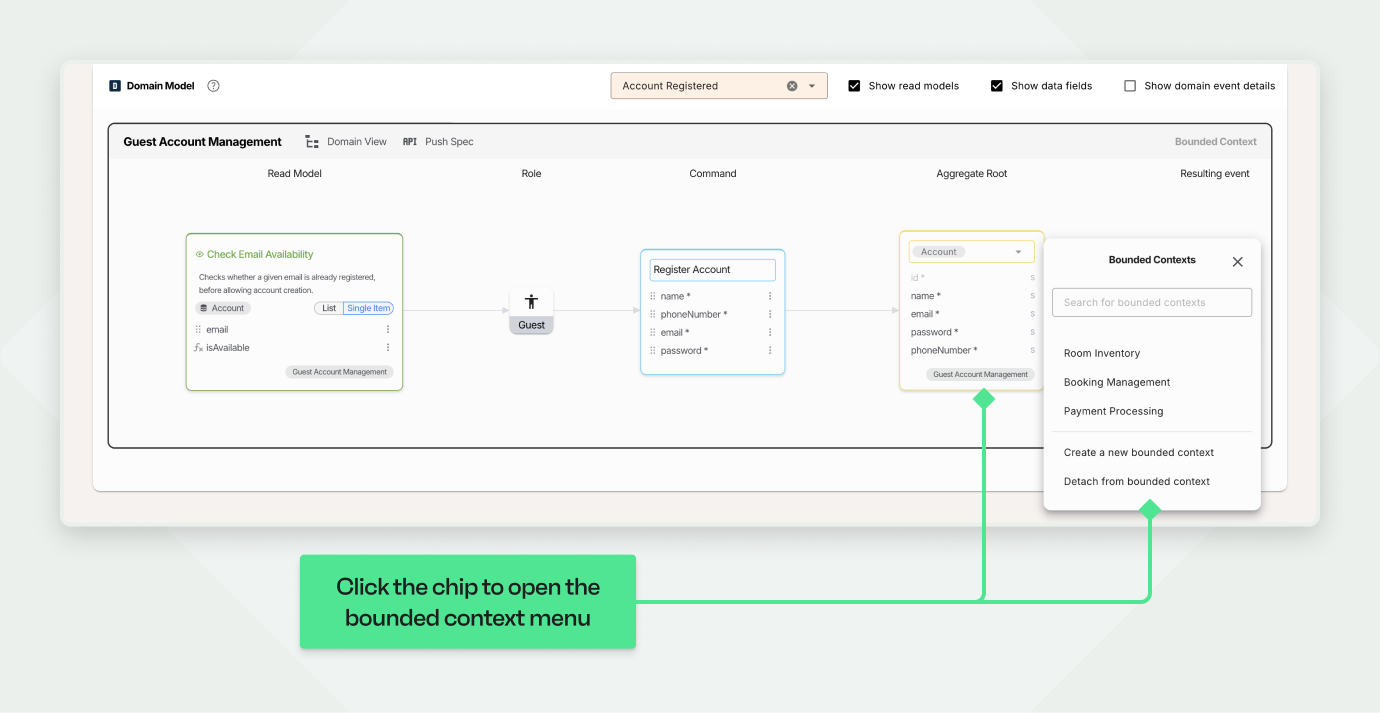
To move an aggregate, click its bounded-context chip and choose another context, Create a new bounded context, or Detach from bounded context. You can also rename or delete a context from its header.
We have reached the final step of Event Modeling. Qlerify not only helps you write the GWTs but also lets you prioritize them into iterations, all while maintaining a complete view of the end-to-end flow and understanding how prioritization impacts it.
To proceed, navigate to the User Story Map tab under the workflow diagram. Here, you'll see each GWT lined up under its corresponding Event. You can add additional GWTs using the sidebar or the button at the end of the page (make sure to select an event first).
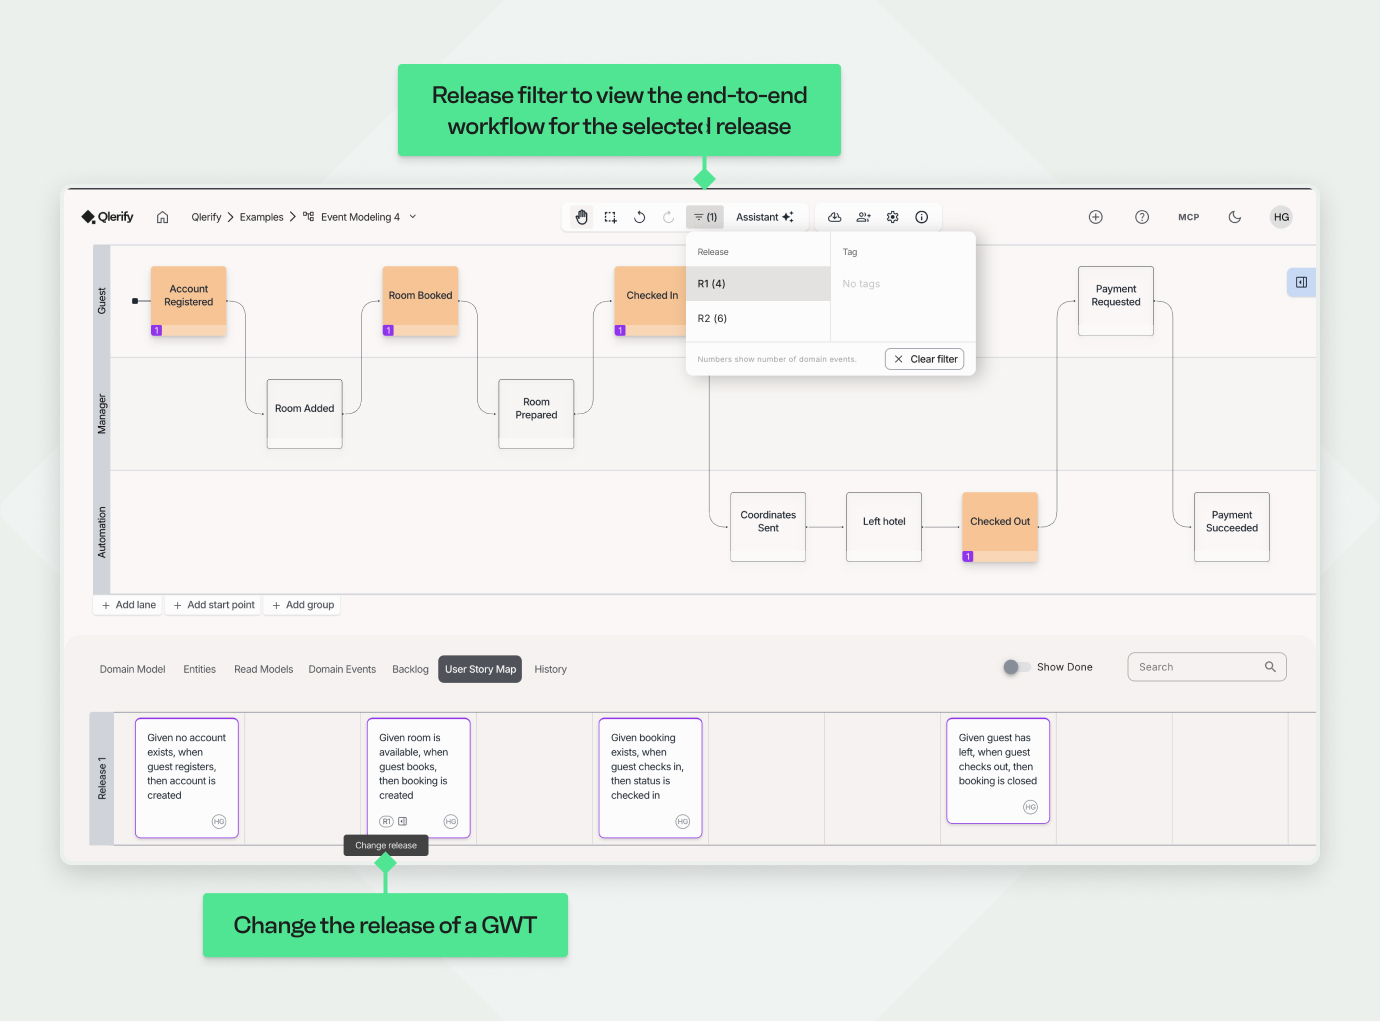
Define the first iteration of your project by selecting which GWTs should be assigned to Release 1. Notice that the selected GWTs move up into a separate horizontal section. You can also add GWTs to Release 2 and rearrange them by drag & drop.
Next, apply a filter for Release 1 using the filter above the workflow diagram. This provides an end-to-end view of exactly which parts of the workflow are planned for the first iteration. This powerful view not only helps you understand the impact of your prioritizations but also serves as a valuable tool for discussing priorities with stakeholders to ensure everyone is on the same page.
This concludes the seven steps of Event Modeling. You have now built a system model using proven methods. From here, your team can start implementing each Read Model and each Command based on priority.
You can also choose to complete the Domain Model by specifying all Entities (see the guide on DDD linked at the bottom of this page). After that, your AI coding agent can generate working code from the model over MCP, as described in the article "AI Generated Code," also linked in the footer.
Some key takeaways from working with AI Assisted Event Modleing:

Event Modeling is a powerful approach to system design, and AI is making it more efficient than ever. By automating repetitive tasks—such as event identification, UI generation, and Read Model creation—AI enables teams to focus on refining business logic and system architecture.
As AI technology continues to evolve, its role in Domain Modeling will only expand. While AI cannot replace human decision-making, it serves as an invaluable assistant in accelerating Event Modeling workflows and reducing time-to-market for software projects.
If you're interested in exploring AI-assisted Event Modeling, sign up for a Qlerify account today (link in the footer). The future of system design is here, and AI is unlocking new possibilities for efficiency and innovation.


