Product
Simple Process Mapping

Your Intuitive Process Mapping & Modeling Tool

A step-by-step guide to visualizing workflows with our simple process mapping tool—now with AI acceleration.

What Is a Process Mapping Tool?

A process mapping tool helps you visualize how work flows through your organization. It turns messy tasks, responsibilities, and decisions into clear diagrams that teams can understand and improve.

Whether you're in HR, customer service, IT, or operations, a process modeling tool like Qlerify helps you:

  • Make responsibilities and workflows visible
  • Find bottlenecks and inefficiencies
  • Improve communication and training
  • Lay the foundation for automation or digitalization

Simple Process Mapping

Process mapping is widely used. However, it often becomes overly complex, leading to frustration and disengagement. The key to effective process mapping lies in keeping it simple—you don't need dozens of different elements!

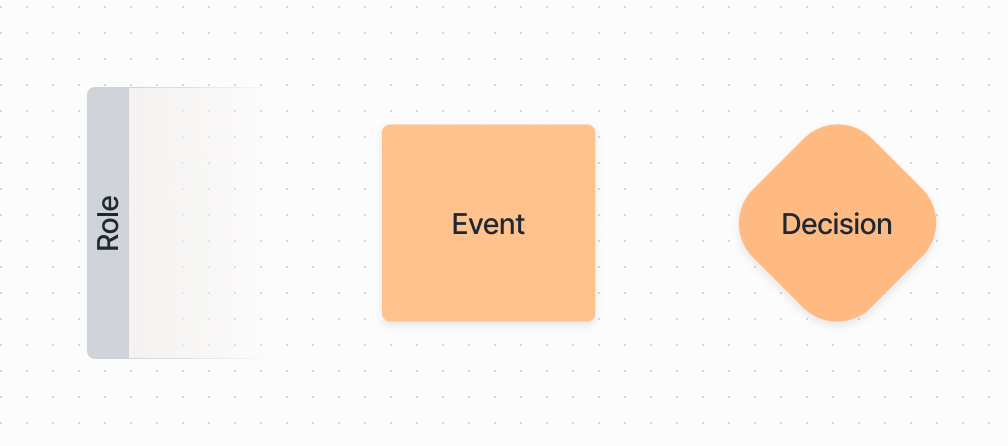
In this guide, we’ll break it down into three essential elements, as shown below: Role, Event, and Decision.

Diagram showing the three core elements of a simple process map: a Role swimlane, an Event card, and a Decision diamond.

Let’s walk through a real example using Qlerify—step-by-step.

How to Create a Simple Process Map in Qlerify (Step-by-Step)

We’ll use a customer complaint handling process to show how Qlerify works. To get started, log in or sign up for free, create a new project, and follow this step-by-step guide.

Step 1: Create a New Process Map

In Qlerify, start by creating a new process map using the + New Workflow button. Name your workflow something like “Customer Complaint Handling”.

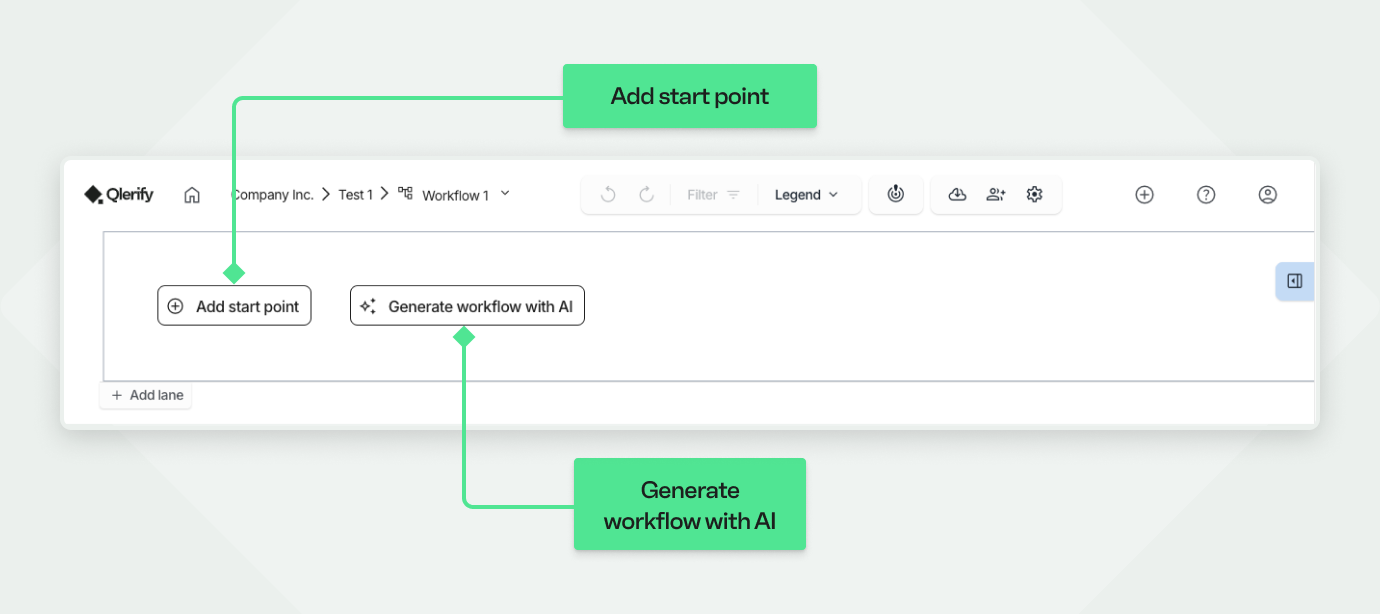
You’ll then see a blank workspace, like the one shown below. This is your starting point. From here, you can:

  • Add a start point manually
  • Generate a workflow with AI
  • Access settings and other tools, for example Invite team members to collaborate

For more details about this view, click the question mark icon in the top right corner.

Screenshot of the Qlerify process mapping tool showing the initial blank workspace for a new workflow. Callouts highlight the two main starting options: 'Add start point' and 'Generate workflow with AI'.

Step 2: Add Roles Using Swimlanes

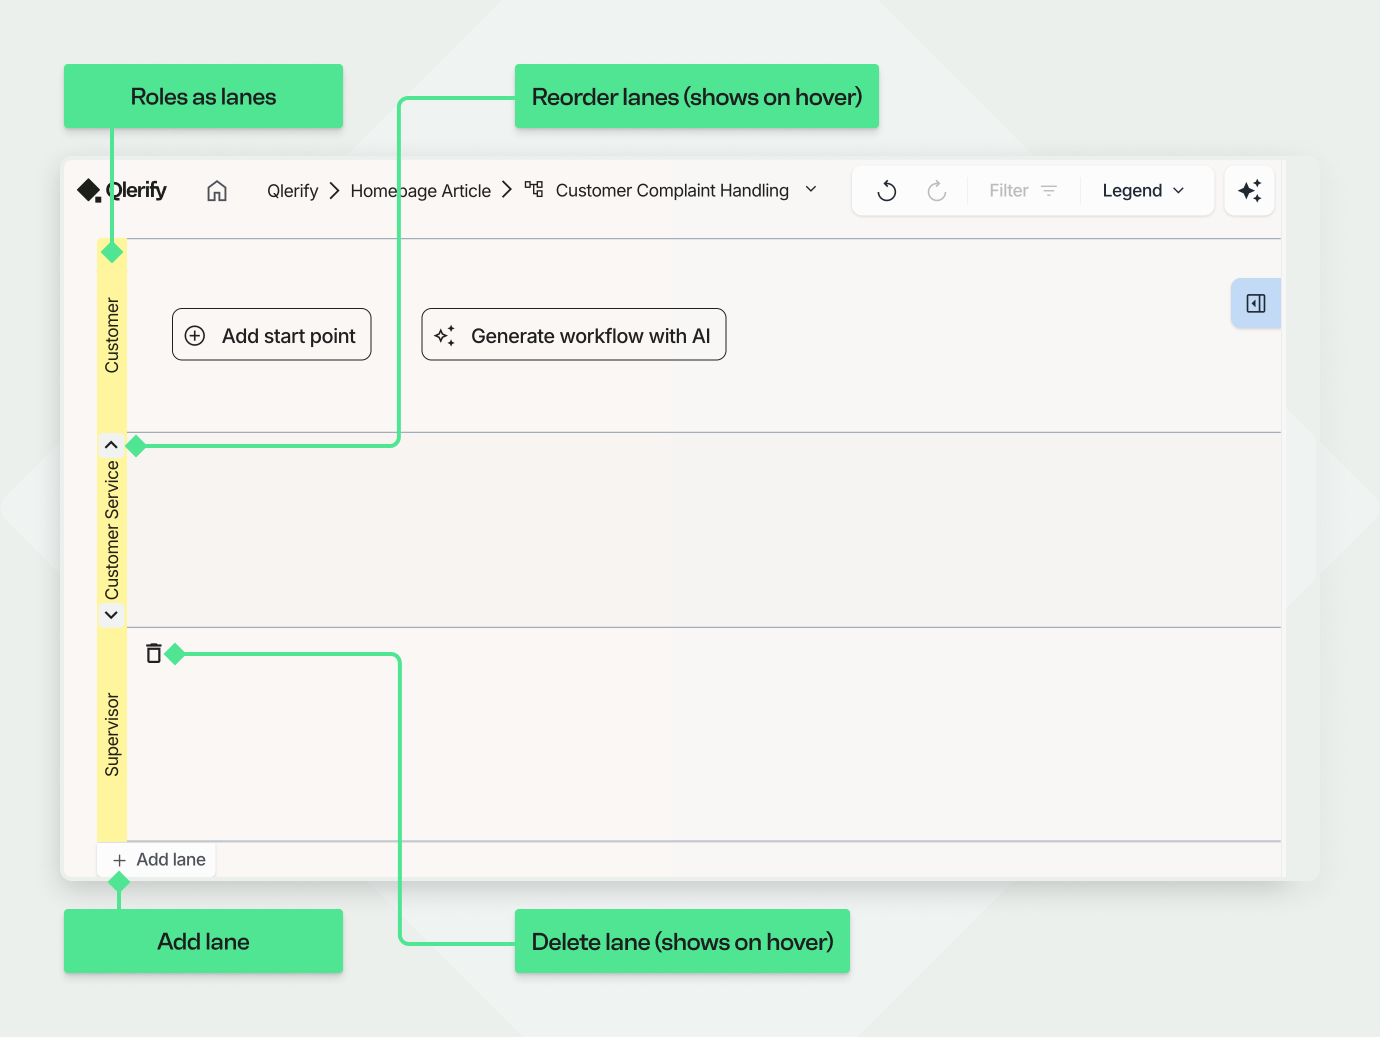
Every process involves different people or systems. Qlerify uses swimlanes to represent roles—these are the “who” in your process. The roles in our example are: Customer, Customer Service and Supervisor.

✅ Tip: A role is a function, not a job title. One person may take on multiple roles in a small team.

To add swimlanes in Qlerify:

  1. Click the + Add lane button three times.
  2. Click on each label to rename the lanes to match the roles above (Customer, Customer Service and Supervisor).
  3. (Optional) To highlight the roles visually, change the lane background color under Settings → Events & Lanes. In this example, we’ve used yellow for visibility.
Qlerify process mapping tool showing swimlanes for roles such as Customer, Customer Service, and Supervisor with options to add, reorder, or delete lanes

Step 3: Add Events (What Happens)

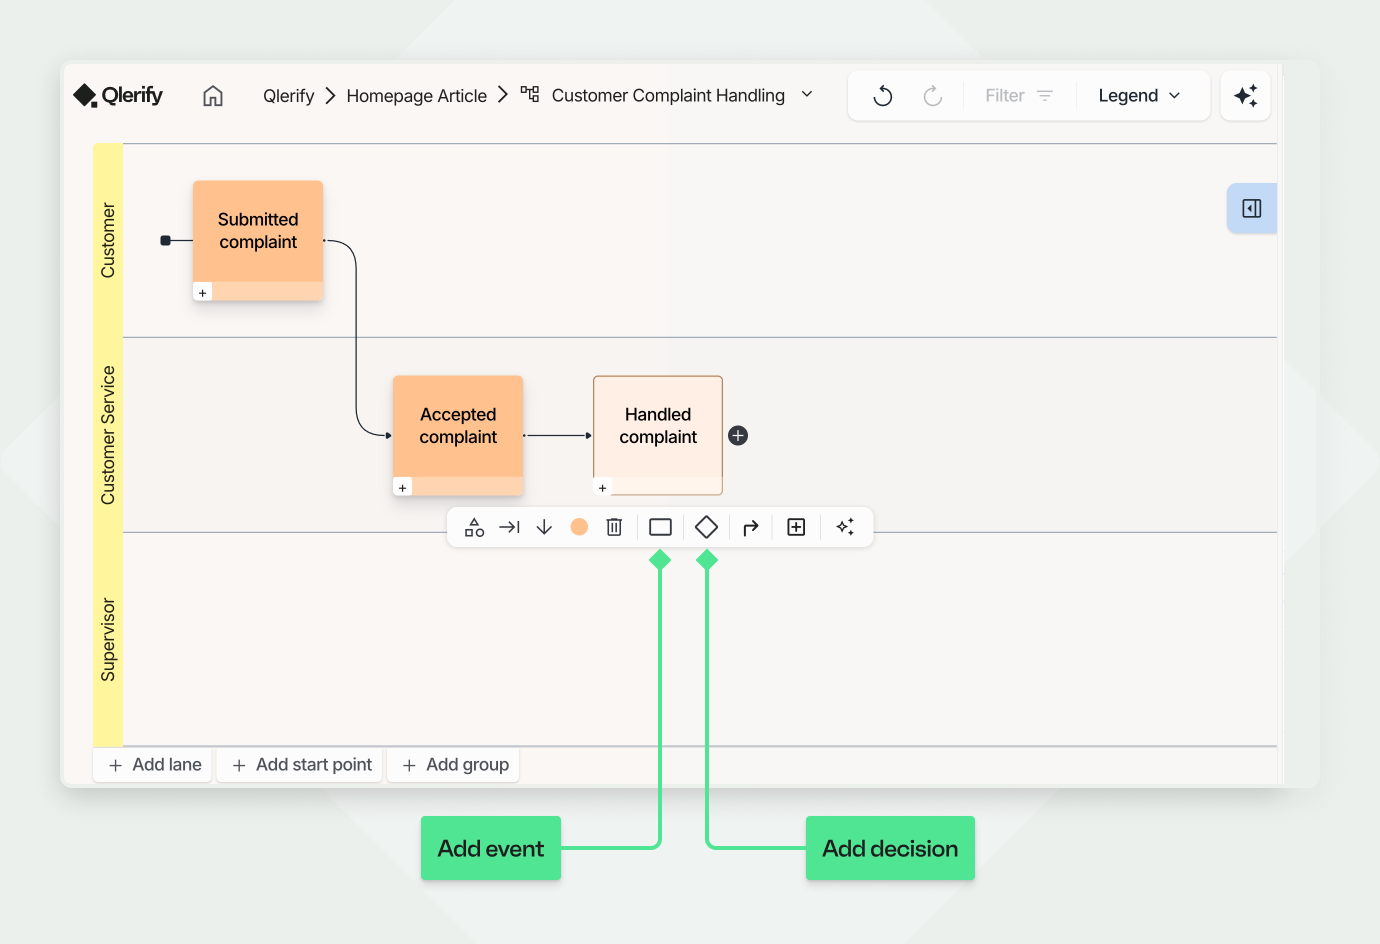
In Qlerify, events are shown from left to right along a timeline. Each event represents something that has already happened in the process. Go ahead and add events:

  1. Click Add start point and enter the first event: “Submitted complaint”.
  2. Click the black round + icon next to the event to add the next one: “Accepted complaint”.
  3. Drag this new event one lane down into the Customer Service swimlane.
  4. Repeat the process to add one more event in the same lane: “Handled complaint”

Your process map should now include three clearly defined events across roles, like this:

A screenshot of the Qlerify process map showing the first three events of a customer complaint workflow. 'Submitted complaint' is in the Customer lane, flowing to 'Accepted complaint' and 'Handled complaint' in the Customer Service lane. Callouts at the bottom highlight the icons to 'Add event' and 'Add decision'.

Step 4: Add Decisions (Where the Process Splits)

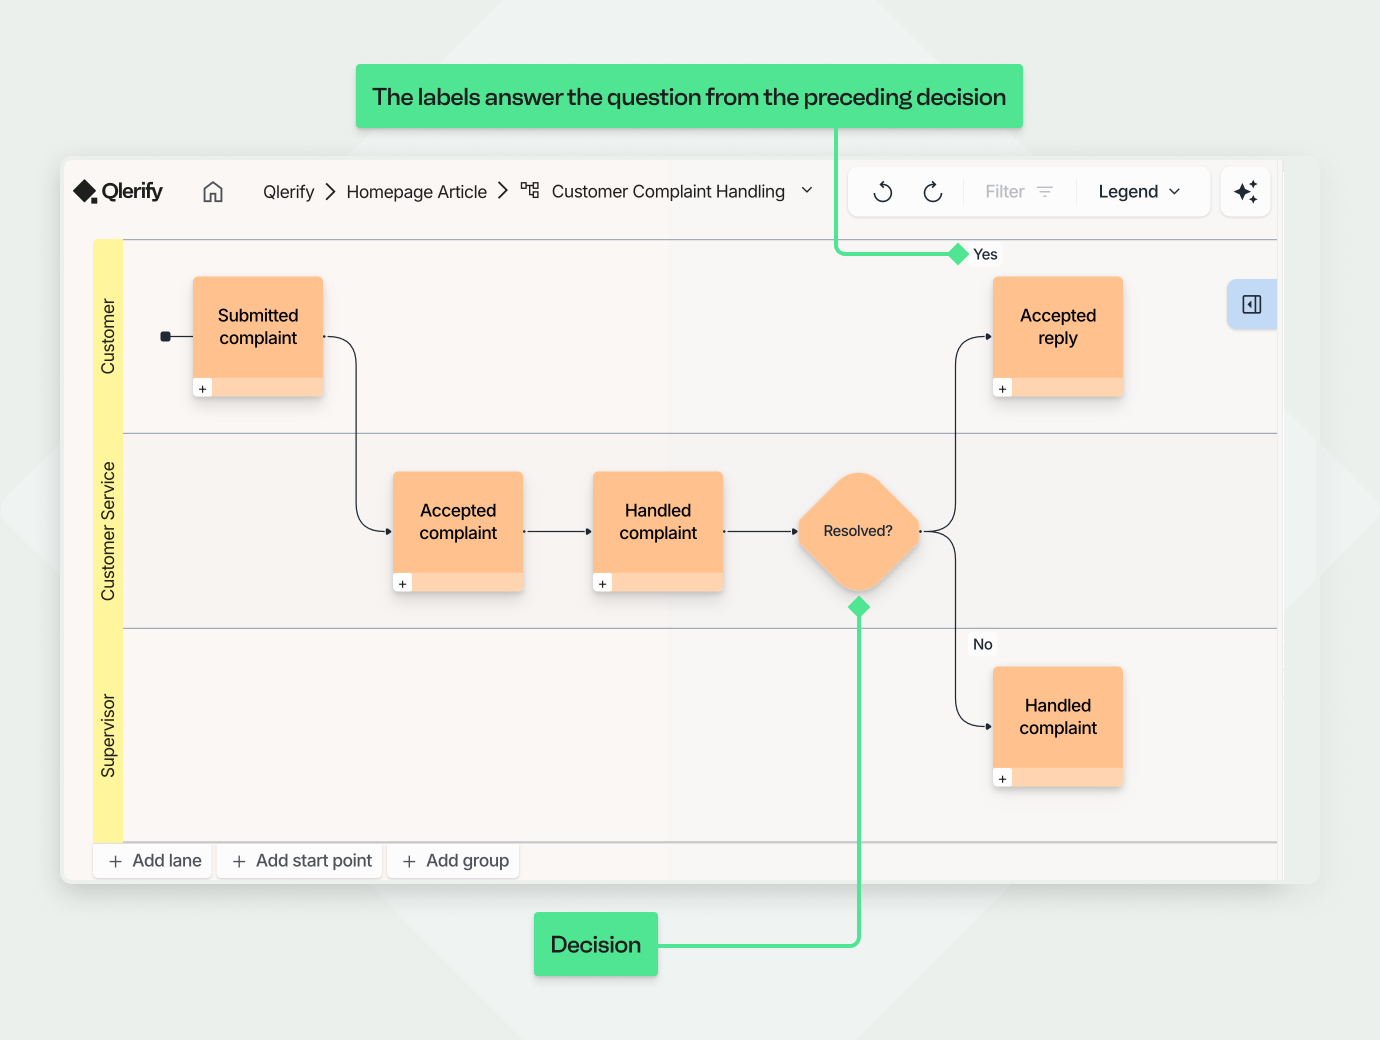
In Qlerify’s process mapping tool, decisions are represented as diamonds and help you map out alternative paths in your workflow.

For example:

“Was this issue resolved by Customer Service?”
✅ Yes → Close the complaint
❌ No → Escalate to Supervisor

Let’s split your process into two branches using a decision.

How to add a decision and two outcomes:

  1. Add a decision after the event “Handled complaint”
    → Name the decision “Resolved?” (including the question mark)
  2. Add an event named “Accepted reply” after "Resolved?"
    → Drag it into the Customer swimlane
    → In the label that appears on the top left of the event, type “Yes”
    (This means the issue was resolved.)
  3. Add another event named “Handle complaint” also after "Resolved?"
    → Drag it into the Supervisor lane
    → In the label, type “No”
    (This means the issue was not resolved and needs more work.)

Note: After a decision, Qlerify displays small labels on the events or decisions that follow. These labels indicate the answer to the question posed in the decision box—making the flow easy to follow.

Screenshot of the Qlerify process map after adding a decision. The workflow now splits at a diamond labeled 'Resolved?'. The 'Yes' path goes to the 'Accepted reply' event in the Customer lane, while the 'No' path goes to the 'Handled complaint' event in the Supervisor lane. Callouts explain how the decision and labels work.

Next Step: What Is Your Goal?

Now you’ve mapped out the basic process, the next steps depend on your goal or the problem you’re trying to solve.

You could:

  • Enrich the map with work instructions, challenges, or improvement ideas
  • Group events by systems to highlight integrations and ownership
  • Annotate known problems and opportunities along the process
  • Or choose your own path forward by defining custom card types under workflow settings.

👉 Check out our Event Storming guide, where we show how to model problems, opportunities, and systems alongside your workflows.

From Processes to Contracts: A Domain-Driven Design Perspective

One of our favorite next steps is to define information objects that represent the data passed between each process step. In essence, we shape small contracts for each step, describing the data being exchanged — the expected inputs and outputs. This approach fosters alignment, increases automation potential, and supports robust software design.

📘 See our Domain-Driven Design (DDD) guides for a deeper dive into using this perspective in Qlerify.

Tip: Qlerify allows you to attach files and links to cards—for example, checklists, UI sketches, etc.

Speed Up Mapping with AI

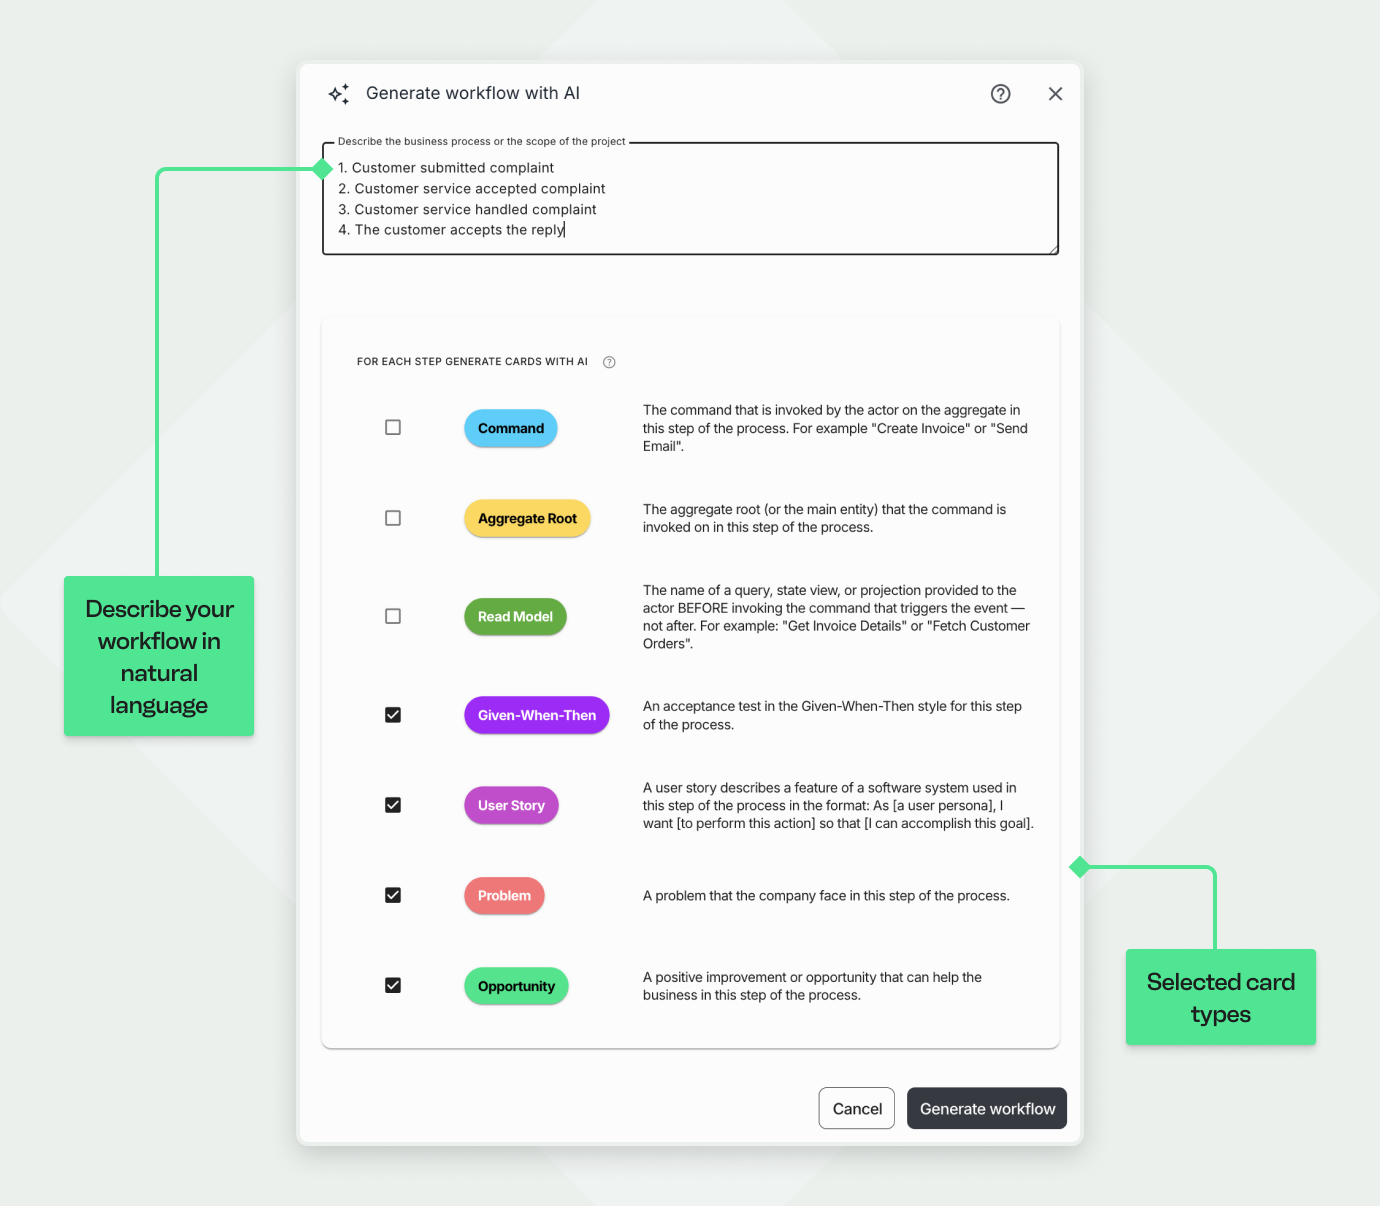
Don’t want to map manually? Use Qlerify’s AI process modeling tool to speed things up. Just describe your workflow in natural language, and the AI will organize it into a structured process map—saving you time and ensuring clarity.

Create a new empty workflow and click on "Generate workflow with AI". Then enter a description like:

  1. Customer submitted complaint
  2. Customer service accepted complaint
  3. Customer service handled complaint
  4. The customer accepts the reply

Select the checkboxes according to the image below and press "Generate workflow".

Screenshot of the 'Generate workflow with AI' feature in Qlerify. The top half shows a text box for describing a process in natural language. The bottom half shows a list of checkboxes for automatically generating additional card types, such as 'Problem' and 'Opportunity'.

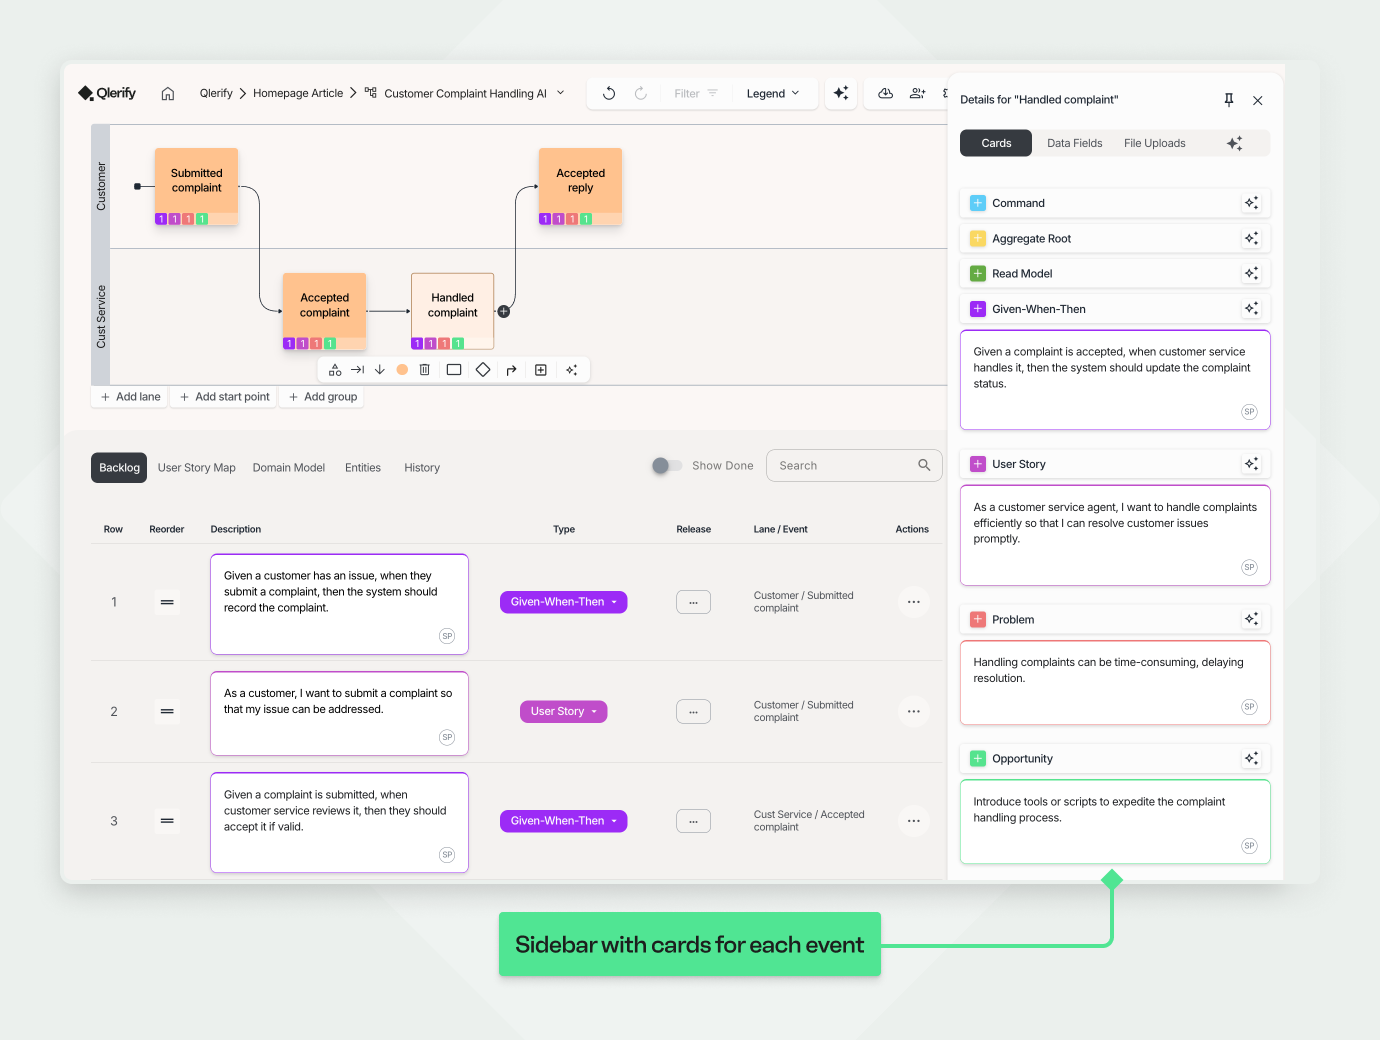
Once the AI generation is complete, you’ll likely end up with a result similar to the example below. Qlerify’s AI automatically generates roles, events, and cards for you.

AI is not yet able to generate decisions, so these need to be added manually — but this is an upcoming feature.

A screenshot showing the results of Qlerify's AI generation. The view is split into multiple panes: a complete process map on the left, a detailed backlog of generated items (like user stories and problems) at the bottom, and a sidebar on the right showing all the specific cards linked to a selected event.
Why Simple Process Mapping Matters

Many tools overcomplicate process modeling. Qlerify keeps it simple:

  • Visual and clear – Anyone can understand it
  • Collaborative – Update and share maps easily
  • Actionable – Use maps to create work instructions or start automating tasks

Whether you're mapping on your own or with a team, simplicity = usability.

An abstract illustration of a process map, showing various steps (squares) and decisions (diamonds) connected to represent a workflow.

Start Mapping with Today

Ready to try a simple and powerful process mapping tool?
🎯 Sign up for your free Qlerify trial and start mapping smarter today.

Need help getting started? Contact us to explore how Process Mapping can benefit your organization!

///SOCIAL SHARE